There’s a moment that every camper looks forward to.
It’s that quiet, cold pause just after sunset — when the wind picks up, shadows lengthen, and the air sharpens with that unmistakable wilderness chill.
Your fingers start to get numb.
It's time to get the fire going.
This is where your fire starter kit either saves the day or lets you down.
For most people, starting a fire is an afterthought. They toss a lighter or maybe a box of matches in their bag and assume that’s enough.
But anyone who’s camped in wet conditions, high winds, or remote areas knows better.
Fire is life in the woods. It’s warmth. It’s food. It creates memories.
And when things go sideways, it’s survival.
That’s why I built a fire starter kit that fits in an Altoids tin.
Yes, it's small.
But don’t let the size fool you.
This thing is a beast when it comes to reliable fire starting.
It’s water resistant, rugged, compact, and fits in your pocket or pack without taking up a lot of space.
Most importantly, it’s built for real-world use, not just Instagram-worthy gear spreads.
Here’s how I make mine, why it works so well, and how you can build one for yourself.
Why an Altoids Tin Makes the Perfect Container
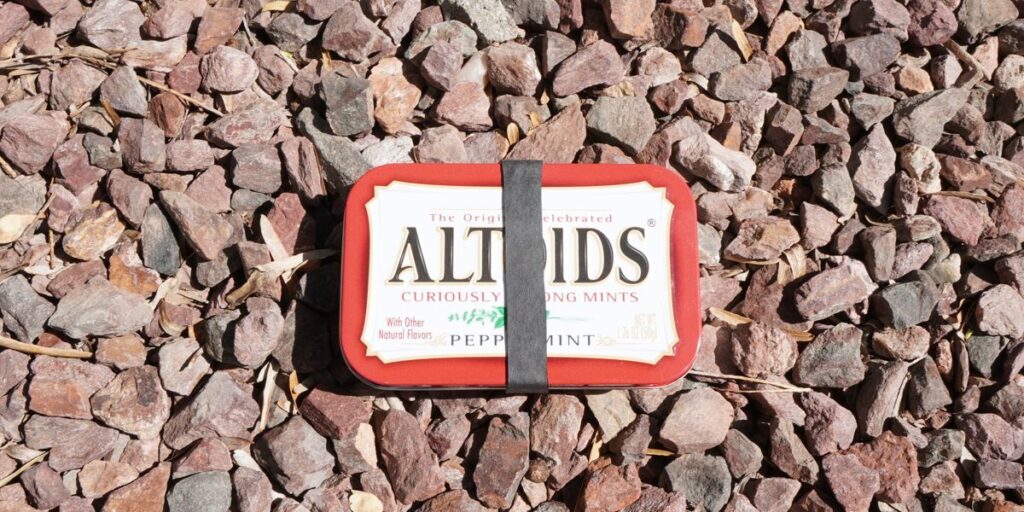
The Altoids tin is a cult favorite in the survival and bushcraft communities for good reason.
It’s durable, lightweight, and just the right size to carry the essentials.
It’s also metal, which means you can place it near heat without melting, and it can be used for other things.
The hinged lid seals well enough to keep moisture out (especially if reinforced with a Ranger Band), and the tin fits easily in cargo pockets, backpacks, glove boxes, or even a belt pouch.
You don't actually have to get an Altoids branded tin. There are many brand new tins that you can buy that are the same size.
It’s discreet and portable, which means you’re more likely to actually carry it…the golden rule of EDC gear.
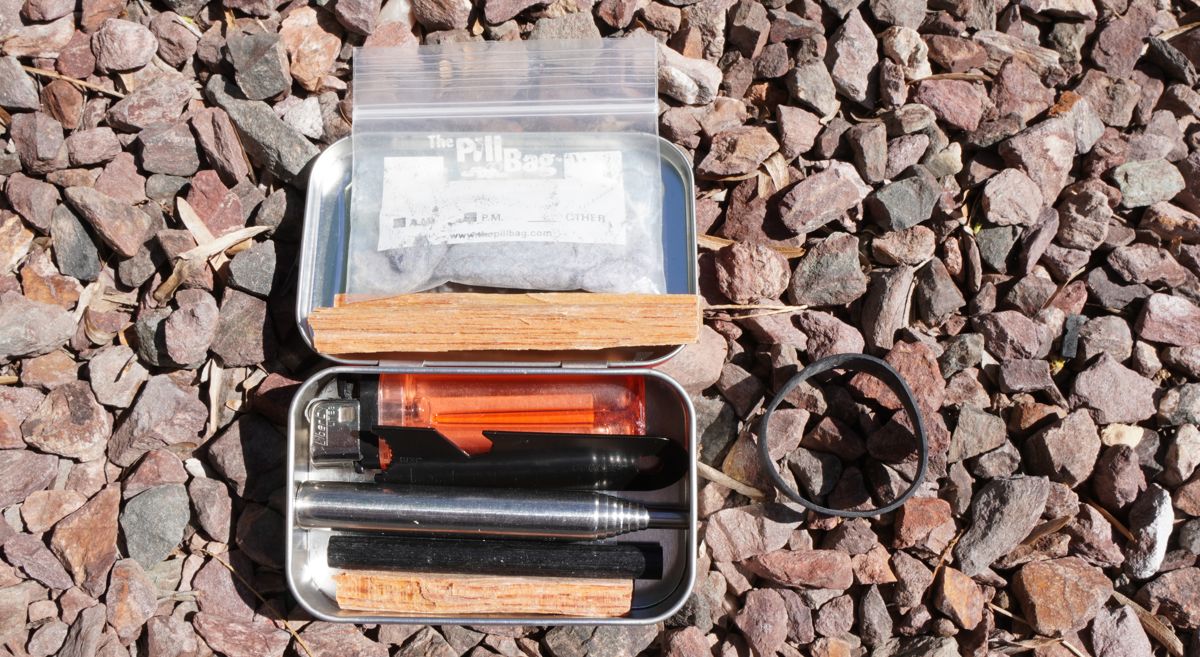
What’s Inside the Kit (and Why It Matters)
Let’s talk about what makes this tiny tin such a powerful fire-starting tool, and how each component plays a critical role in getting flames when you need them.
Each part of this kit has been carefully chosen for its reliability and simplicity.
Lighter
First, I start with a classic “gas station lighter“, like a Bic. Use anything that will fit in the tin.
Sure, it's way more impressive (mostly to you) to be able to start a fire without one.
But why make things harder than they need to be?
A lighter is not glamorous, but it has a long shelf life and gets the job done.
Here in Arizona, the wood is usually so dry that I can just throw it in the fire pit, flick the lighter, and have a roaring fire going in no time.
No need to channel my inner Bear Grylls.
Fatwood

Next is fatwood, nature’s gift to campers.
Fatwood is resin-rich pine wood that lights easily and burns hot, even in damp conditions.
I cut a few short sticks to fit the tin and create shavings from them when needed.
They act as tinder, kindling, and fire extender, all in one.
In most cases, I can find some kindling in the area that we are camping.
However, if that ever becomes a problem, then it's good know that I have the fatwood sticks.
Of course, there are other ways to keep fire starters on hand. You can even use natural waste products.
But my favorite, by far, is fatwood.
Pocket Bellows

I also include a collapsible metal tube, which might seem odd at first, until you try blowing on a fledgling fire and get a face full of smoke.
Or if you've ever tried to get a fire going by fanning it with an empty beer box, you'll understand why this little straw is so valuable.
It lets you direct a strong stream of air precisely where it’s needed: at the base of your flame.
Fully extended, the tube is about 19 inches or 48 centimeters.
The oxygen accelerates combustion and works wonders when reviving a smoldering ember, especially in wet conditions.
Using this tool also keeps your face away from the flame and smoke, which makes fire starting much more pleasant.
Since it folds up small, it's perfect for this kit.
Ferro Rod and Striker

The ferrocerium rod is the backup to my lighter.
This thing throws molten sparks that reach temperatures of over 3,000°F. At least that's what the internet says.
With the included striker, I can reliably produce sparks no matter how wet or windy it is.
It’s also ideal for long-term use, since it doesn’t run out like a lighter or matches.
Dryer Lint

As a backup to the fatwood shavings, I pack a small bag of dryer lint, stored in a pill bag.
This stuff is ridiculously flammable and makes the perfect tinder.
Just a pinch of it fluffed up can catch a spark instantly and get the campfire going quickly.
I like having this in case the fatwood gets lost and there is no high quality kindling in the area we are camping.
Ranger Band
Finally, the entire tin is secured with a Ranger Band, a thick rubber loop that was originally made from a bicycle inner tube.
At one point, I got tired of rubber bands breaking and gave up on having a rubber solution. But then I found these bands on Amazon and they work great.
Now they are specifically manufactured to be used as a way to secure gear.
The military uses them, so you know they are tough.
It’s waterproof, almost indestructible, and pulls double-duty as gear organization or emergency bindings.
I highly recommend having them around, even if you aren't into Altoids tin kits.
How to Pack Your Fire Starter Kit

This isn't rocket surgery, but here's how I pack the tin to maximize the amount of stuff it holds, with minimal rattling.
I start by putting the lighter, ferro rod, striker and straw in the tin first.
Then I pack as many fatwood sticks in there as I can.
After that, I put the dryer lint into the tin and close it up. Having the dryer lint is also helpful because it cushions the contents so they don't move around.
Wrap the tin with your Ranger Band and you’re done.
And there you go…a complete fire starting kit, no bigger than a deck of cards.
How to Use the Kit in the Field
When you’re ready to build a fire, the process is simple.
First, clear a fire-safe area. A fire pit or BBQ stand is obviously ideal.
Collect larger pieces of wood and small kindling material like dried grass or twigs.
Build a “tepee” with the larger pieces. Be sure to leave a “door” so that you can light the kindling inside.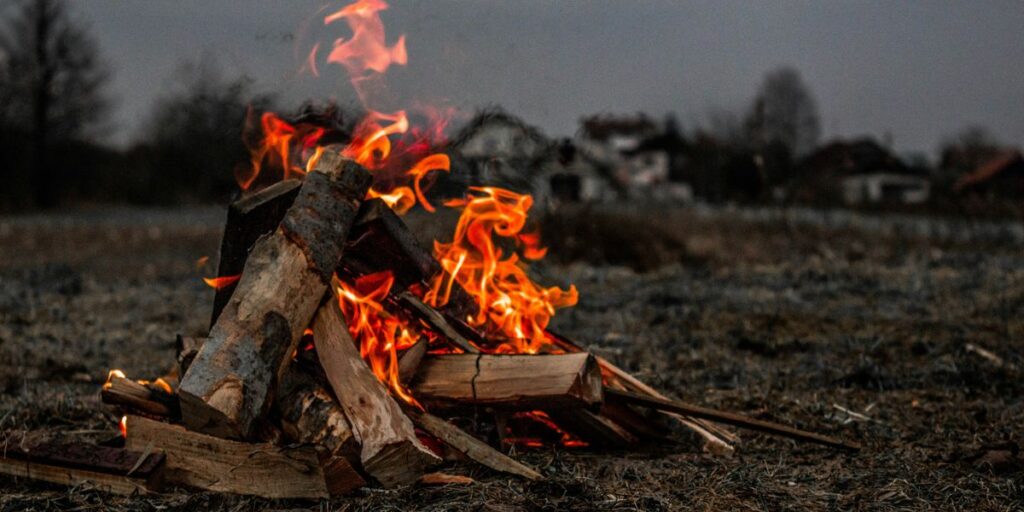
This will serve to shield the wind while you're working on getting the kindling going.
Put a pile of kindling inside the tepee, and light it with the lighter.
That's the ideal scenario.
If the kindling is damp and you can't get it started, then you'll have to use the fatwood to jumpstart it.
Shave a few curls off your fatwood and put them in a pile under the kindling. If you’re using the lighter, a quick flick should light the shavings in seconds.
If you’re going the ferro rod route, hold the rod close to the fatwood and scrape firmly with your striker.
The sparks will hit the shavings and should catch almost immediately. Once you see flame, feed it gently with small twigs.
Use the collapsible straw to blow directly at the flame base.
This boosts heat and encourages stronger combustion, especially in damp conditions.
If you're out of fatwood, then just substitute the dryer lint.
Final Thoughts: Don’t Leave Home Without It
There’s a saying in the survival world:
“Two is one and one is none.”
This means that you should expect your primary gear to fail and therefore always have a backup.
When it comes to fire starting, that couldn’t be more true.
Your Altoids tin fire kit isn’t just a cool DIY project.
It's an insurance policy against cold nights, wet mornings, and gear that fails when you need it most.
All in a super portable and durable package.
They cost very little to make, but could be the difference between comfort and crisis.
If you haven’t built one yet, consider making this your weekend project. Then take it outside and try it out.
Now you've got one less thing to worry about on your next camping trip.
After you finish this project, maybe create an Altoids travel jewelry box.